Wednesday, April 25, 2012

Multiple Cards anyone?

One day last week I was asked by two different people how many cards I create at one time.  I said I almost always do only one at a time.  This got me thinking... I think I have only sent one (yes, one!) card to anyone in the last six years or so. Other people make more than one at one time?
I make my cards and I keep them as my "samples" and I guess I don't want to part with them.  I just plain LIKE making cards!  I have had people want to buy my cards but I have always suggested that I teach them how instead (I did have someone strongly pressure me to sell her one of my cards because it "was the perfect card and I need one tomorrow" - which I ultimately did and I charged her a whopping $2).

I have given a stack of cards as a gift and my intentions are always that I give more card gifts. But... why don't I make more than one?  I know that I waste a lot of paper creating a card and I usually have a half dozen or so "false starts" before I end up with something I like. It also takes me hours to make just one!

My challenge to myself was to make several at one time and find a design and just stick with it.

I started with the card I made a couple of hours earlier (the Christmas Dove).  I decided that I really didn't like the leaves I added (put on because of the sketch challenge I was entering).   Here is my first batch:


Okay, I'm on a roll..I should be in bed but I have more ideas that I want to work on... So here was my second card (closeup at the top of this post):


This was heat embossed with clear embossing powder and then sponged with Pumpkin Pie and Soft Suede. I rubbed the ink around in a circle with an extra sponge (so I didn't contaminate the colors) to be able to blend the colors a little more. I then stamped the background words from the Stampin' Up! Flores Suaves set (to be discontinued at the end of May). Of course I rubbed off any ink that was on the embossed image.

Yes, I should have gone to bed (the sun will be up soon....) but I wanted to do one more while I was "rollin'".  This one needs to be quick and easy. Here is the result of that one:


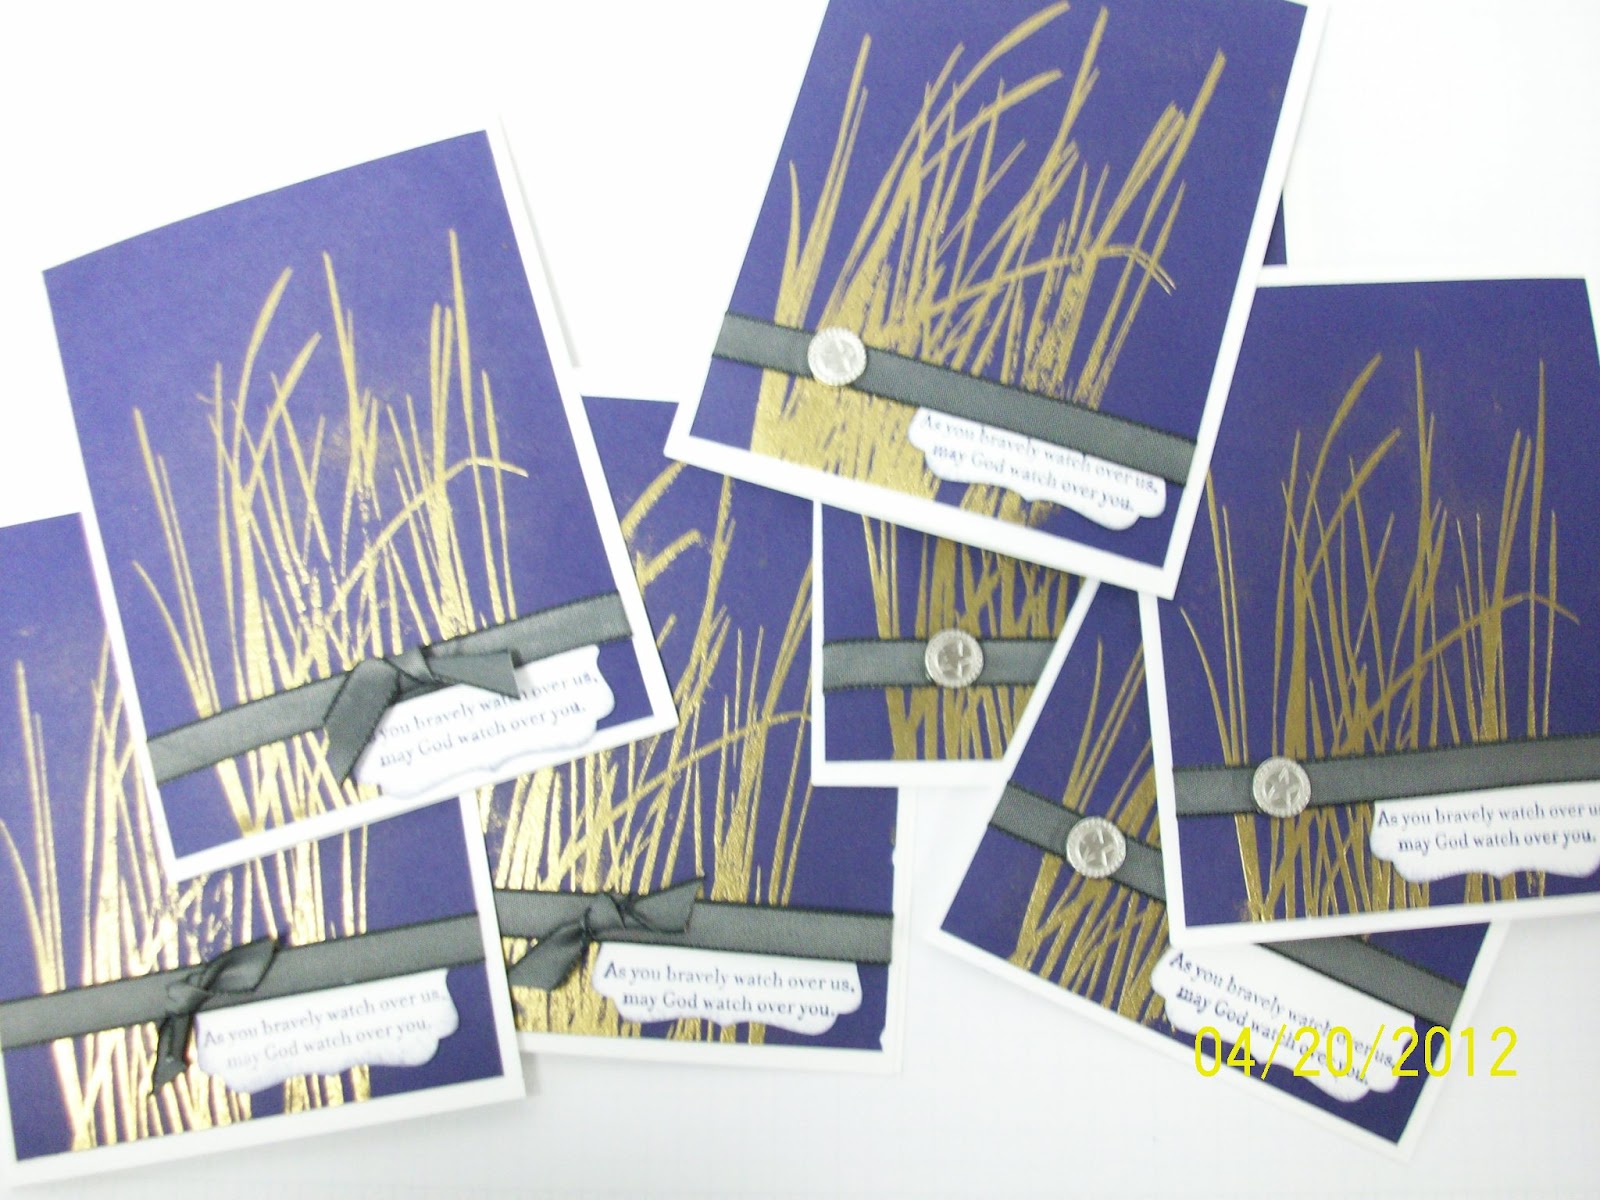
This was stamped (Inspired by Nature) in Versamark and heat embossed with gold embossing powder. I stamped the sentiment (from Service & Sacrifice) and punched it out using the Decorative Label Punch,. And ... I made several of them:


Well, I'm tired but I DID IT!!! I actually made several of the same card at the same time!!

What do you do?  Do you make one at a time?  Do you make a bunch at a time? A combination of both?

Do you give card sets as gifts? Do you sell your cards? Do you send handmade cards at various times during the year? Do you have a "stash" of cards ready to send out as you need them?

Thursday, April 19, 2012

Christmas Dove

Have you started your Christmas cards yet?  LOL!  The challenge I am entering tonight is from Always Playing With Paper for their Merry Monday #16 (Merry Christmas) Challenge.


I haven't thought about Christmas cards for several months, but there's no time like the present to start thinking of ideas. I decided that I'd do something decidedly different than what I have been doing lately.


I selected a stamp set from Stampin' Up! that will be discontinued at the end of May (Gifts of Christmas) and two in-colors that will be discontinued (Poppy Parade and Pear Pizaazz.  I made the background pieces by creating my own designer paper stamping the same image all over the paper.  I cut the strips and distressed the edges.  


For the center piece I took Versamark ink and stamped the dove image and heat embossed it with iridescent ice embossing powder to give it a little sparkle. I took several pictures but I wasn't able to get the sparkle to show.  I sponged the two ink colors over the main image piece and rubbed off excess ink from the embossed area.

I took some leaves cut with a Sizzix Embosslit cut out of scraps of the in-color pad paper and inked a little of Poppy Parade over it.  I then sprayed a little Smooch to give them a little shimmer.

The especially nice thing is that I only used white cardstock (except for the small scraps I used on the leaves).  With a little ink anything is possible!

So, again, have you started on your Christmas cards yet?

Wednesday, April 18, 2012

Spring Wiper Card

Today's card is a bright spring card perfect for Mother's Day or an anytime "You're Fantastic" note card.  I am entering two challenges.  The first challenge is from Paper Creations Ink and is Challenge #23 - "April Flowers Bring May Flowers".  The second challenge is from Paper Play Challenges for their " '12 Week 15 - Things With Wings" [Missed this one - forgot that Australia is a day ahead!]. So...I will enter Challenge #1 at Just keep on Creating; Anything Goes instead.

The card starts out to have a pretty basic look.


If you let the card free stand you definitely realize that this is no ordinary card:


When you pull the sides the beauty begins:


Here's a closeup of the top:


I decided to use items that are all going to be discontinued by Stampin' Up! May 31. I love the Poppy Parade color and will miss that and the "Flores Suaves" stamp set the most.  ;-(   The butterfly and the side rose are from "Flores Suaves", the sentiment is from "Perfect Words" and the flowers on the front are from "Three Little Words". The patterned papers are from the In-Color paper pad.

I saw this technique in a tutorial by Bette.  I thought the card needed somewhere to add a little note so I added the little card in the front.

Any suggestions on how to keep the front card closed?  I tried a few different ideas but wasn't pleased with any of them. I also didn't want to use ribbon because I thought it would take away from the rest of the card (to run the ribbon so it would tie on the side of the card)


What are your favorite cards with "mechanics"? I don't know that I have a favorite - I think I just like variety!!

Sunday, April 15, 2012

Baby Scrapbook 2-page Layout

I'm not much of a scrapbooker but here is a 2 page layout that I put together a few months ago. I have bunches of punches and like to play with them for more than their intended uses. I had seen a few ideas making baby-type designs and thought that a baby's room would be perfect if someone had to do a layout for pictures of a new baby.


The background paper was from Stampin' Up!s pad papers.  I thought it reminded me of what might be a wallpaper pattern.  I added a chair rail to add a little interest to the page. The flowers are buttons


 The furniture was made out of punches and the drawer handles were coated with Crystal Effects.


The letters were die cut with my Big Shot.


The "frame" on the wall was from the "Four Frames" stamp set with a sentiment from "Blessings from Heaven" (both Stampin' Up!


So...should I try my hand at more page layouts?  Do you usually use pre-made pages when you scrapbook or do you build your pages around the photos you have? I welcome your comments!

Thursday, April 12, 2012

Interlocking Frame Card

I have seen several interlocking frame cards but I thought I'd try one with more than just the outside and inside frame pieces.  It starts out looking like a regular gate fold card.

I am entering the Divas By Design Challenge #29 - Anything Goes [Whoops - guess I didn't get it in time for this challenge!) and Just Keep on Creating Challenge - #1 - Anything Goes.

 
Then start to open the card...

Now it starts to get interesting...

I have the outside frame, the next size frame, and then the center piece was cut into three pieces each one alternating in direction.  The frame pieces are from the new Sizzix Framelits (this one is from Stampin' Up).

 Here is the open card:

The designer paper I used is from Letters to Santa and the In-Color stack (it is a double layer to make the layers firmer), the Stamped sentiment is from Tagtastic, the swirls (on the back of middle tri-cut piece and the inside of the card) are from Priceless (retired), and the embossing on the front is made using the Sizzix Elegant Bouquet Embossing folder - all from Stampin' Up.

If you have done an interlocking frame card leave me a comment with a link - I'd love to see what you have made!

Tuesday, April 10, 2012

Lattice Die Cuts for Sale

Wow - I can't believe how many of you asked for these!  So..I am making them available for sale.


 I will work out getting a regular "cart" set up later, but I do know how to set up individual items for sale. If you look on the right side of my blog you will see the items/quantities you can choose from. The payments will be made through PayPal.

Check out my last post for an idea of how to use these. Look for more ideas in the future!

Please note that the $1 shipping amount is for shipping to the US only.  If you are interested in having me ship somewhere else, please let me know and I can tell you how much it will be.

Saturday, April 7, 2012

Something Metal

The challenge I'm entering today is "Heavy Metal" - Challenge #146 from The Corrosive Challenge Blog.


Again - PERFECT TIMING! I have been playing with soda cans and my Big Shot. What I did with this card is cut the top and bottom off a soda can (with tin snips) and then down the side of the can (using craft and rubber scissors). I ran it through my Big Shot using the Lattice die.


Many years ago (15 - 20?) there was a TV show on PBS that featured the creator of Aleene's Tacky Glue. Apparently when they developed the glue they tested it for flammability and came up with a great technique they called Burnt Brown Bag. They used a brown bag and covered it with glue and burned it. Instead of the bag burning, it gave the bag a great sooty appearance.

Since I have access to an unlimited number of soda cans (free), I thought I'd try to see what would happen if I used the same technique using a soda can. If I used the lattice die (Stampin' Up!) it could look a lattice fence. I coated the can with some Aleene's Tacky Glue and smeared it so that all surfaces were coated.


I then took a candle and held the piece in the flame until the glue becomes "sooty". Even though I used a votive candle here, I found a plumber's candle works much better (found in any hardware store or a well-stocked toolbox).


I found that the final appearance looked like an old metal fence. I'd bet that if some distressing inks in some greens would probably give it a nice patina look. I "squished" down the bubbles and "intersections" while they were warm to give it the look I was going for.


As a side note, the look on paper is a little different but would work nicely in this application. Using metal did make the glue burn a little different and sometimes created a bare spot on the metal where I had to go back and touch up with a bit more glue and burning. You have to use a little more care when using paper because the glue is only on the front and the flame may try to burn the back side - be prepared to quickly blow out the flame if that happens (safety first!). If you use paper you will need a small paper towel to brush off the excess soot.  I didn't find that an issue with the metal.

The stamp is from Mountainside Crafts (online store), the leaves are from the Bird Builder punch and the flowers come from the flower shape from the Bitty Shapes punch (both Stampin' Up!) with a pearl in the middle. I distressed the leaves with Old Olive and More Mustard ink.

Let me know if you try this technique - I'd love to see your efforts!!

Friday, April 6, 2012

Swirls and Whirls Challenge

The challenge I am entering today is from the Totally Gorjuss blog. The challenge they set forth is "Swirly Whirly" - Challenge #125. Perfect timing! I have been wanting to use my Bigz Tulipe die more and this is just the opportunity I needed to pull it out.

So...I decided to do a monochromatic color scheme and let the swirls and whirls be the star.

The bottom cutout was from the bottom of one of the the Designer Cuts Cards & Envelope set designs. The swirls and whirls were from the Bigz Tulipe die, and the pieces at the top and bottom of the oval with the sentiment was made using the Doily Triple Layer Punch (setting #2). I distressed everything with River Rock ink and the sentiment (from Stampin' Up!'s Tagtastic set) was inked in Soft Suede. Lots of dimensionals were used to add a bit of interest and assorted sizes of pearls were used as embellishments.

Simple, understated, yet elegant - a win-win card!